What follows is a tutorial for getting the best out of Andromeda Software's Cutline Filter for Photoshop. Cutline takes any photo and creates a woodcut black and white effect. I'm developing a new identity for a large insurance company and instead of using the same tired stock images of business men shaking hands, I'm using these faux-woodcut images to separate our look from everyone else. I've noticed that there are a few tricks to getting the best effect from this filter.
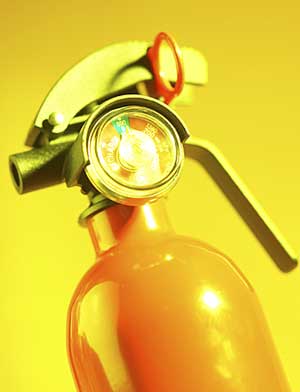
It's best to start with a least a medium to hi-res image, even if you are going to use it online. Soft-focus images with a small depth of field don't work as well as photos that are sharp all the way through. Step one: Channel selection, grayscale conversion and outlining. With an RGB image, I look through each channel to find the one with the most contrast between elements. I chose the Green channel and then converted the image into grayscale. I also use the pen tool to outline and separate the main object from the background. At this point, I also use the pen tool to outline areas where I want there to be additional image separation (more on that in Step Four).

Step two: Details. I've found that areas of texture and fine detail are difficult to render. Unless those areas are important to the visual, I get rid of them. On this example the gauge of the fire extinguisher looks crappy. So here I created a new, clean gauge area using the gradient tool.

Looking at the highlights along the body of the cylinder, I think that there is too much going on there. I'm going to smooth that out with a simple path selection and GAUSSIAN BLUR. A setting of 7.5 worked well on my 300 DPI image.

Step three: Contrast. In order to get the best range of tones and contrast, I play with CURVES first. You'll want to push the contrast of the image much farther than you would normally feel comfortable with.

Now I'll use the DODGE and BURN tools to go in and tweak small areas of the image. I've also use the BRUSH tool to paint in highlights and shadows.

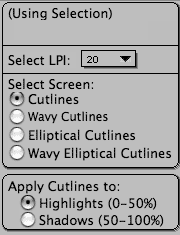
Step four: Filter. Once I get the image to this point, I try a quick apply of the filter. One thing you should know here. I tend to go back and forth between applying the filter, then undoing it, tweaking a small area, then applying the filter again. This sounds tedious, I know, but I'm a perfectionist. I also only apply the filter one section at a time. This helps the image to not only look more like a hand-worked woodcut, but to create a better defined image. Make a selection using the one of the paths from Step one. On an image size of 8x8 @ 300 dpi, I've use the following filter settings for the main image.
Next, I rotate the whole image 90 degrees (either direction). I'll make another selection and apply the filter again: Rotating the image 45 degree, I'll do the last area. This time I'll use a LINE SCREEN setting of 15 instead of twenty. Rotate your image in the opposite direction to get it back to it's original orientation. You'll find that your canvas size has grown as you've rotated the image. I just crop it as needed. Depending on the initial results of each filter run, I usually end up hitting the UNDO command and tweaking some area here or there to get the right amount of tonality in the woodcut effect.
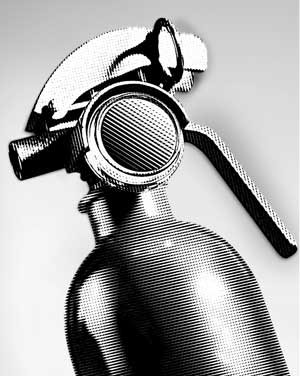
Step five: Background For the insurance company brochure, most of the images are single object. So instead of having them float in white, I create a simple background to set them against. Make a new layer, fill it with white and put it behind your object layer(s). Grab the GRADIENT tool, select the simple Black to White gradient and use the RADIAL setting. Create a small radial gradient behind the main object. Rotate the image 45 or 90 degrees in the opposite direction as your previous steps. Apply the filter, but use a much lower LINE SCREEN setting (I used 8). The final result:

(click for a larger image)
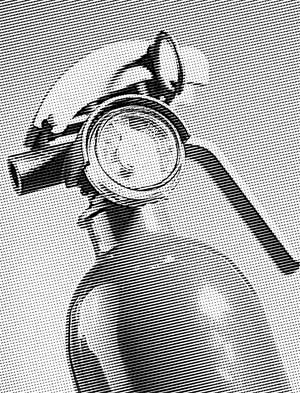
Just to show you the difference all these steps take, here's the effect applied to the image with nothing but a grayscale conversion:
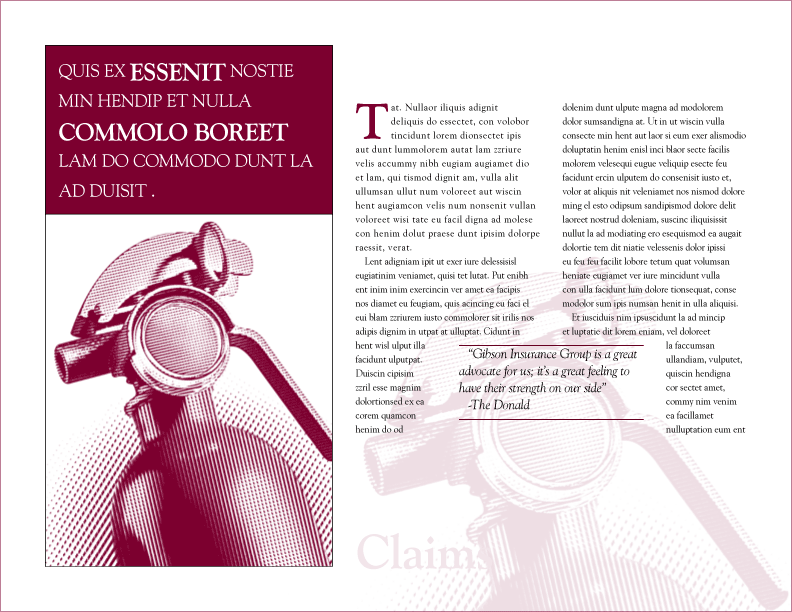
Click here and you can see the page layout that this image is being used for.